Hydrangeas are popular garden plants known for their stunning flower clusters and lush foliage.
Growing hydrangeas from cuttings is an excellent way to expand your garden without the expense of buying new plants.

This guide will take you through the step-by-step process of propagating hydrangeas from cuttings, ensuring you have healthy and beautiful plants in no time.
Benefits of Growing Hydrangeas from Cuttings
Growing hydrangeas from cuttings allows you to replicate your favorite varieties, save money, and enjoy the satisfaction of nurturing a plant from start to finish.
It’s also a great way to share your favorite hydrangeas with friends and family.

Preparing for Propagation
Choosing the Right Time
The best time to take hydrangea cuttings is in late spring to early summer when the plant is actively growing.
This period ensures that the cuttings have the optimal conditions for rooting.
Selecting the Perfect Cutting
Choose a healthy, non-flowering stem that is free from disease or damage. The stem should be new growth, typically green and flexible, but firm enough to support itself.
Gathering Necessary Supplies
Before you start, gather the following supplies:
1: Sharp, clean pruning shears
2: Rooting hormone
3: Small pots or seed trays
4: Potting mix
5: Clear plastic bags or a propagator
Labels and a pen

Step-by-Step Guide to Growing Hydrangeas from Cuttings
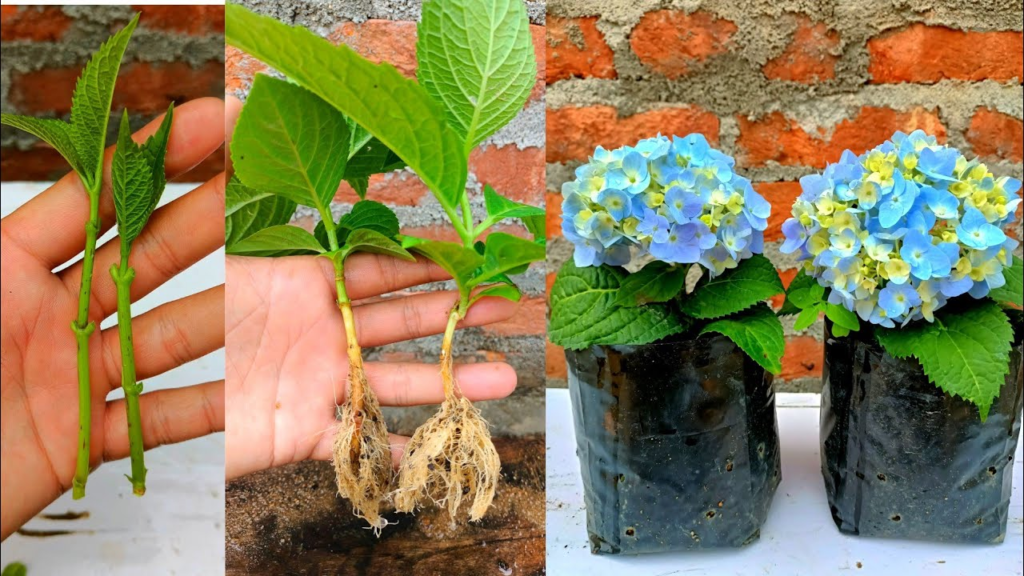
Step 1: Taking the Cutting
1: Identify the Stem: Select a stem that is at least 4-6 inches long.
2: Make the Cut: Using sharp pruning shears, cut the stem just below a node (the point where leaves attach to the stem).
Step 2: Preparing the Cutting
1: Remove Lower Leaves: Strip off the lower leaves, leaving only a few at the top.
2: Trim the Stem: Make a clean cut just below a node to encourage root growth.
Step 3: Applying Rooting Hormone
1: Dip in Rooting Hormone: Dip the cut end of the stem into rooting hormone to enhance root development.
2: Shake Off Excess: Tap the stem gently to remove any excess hormone.
Step 4: Planting the Cutting
1: Prepare the Potting Mix: Fill small pots or seed trays with a well-draining potting mix.
2: Make a Hole: Use a pencil or stick to create a hole in the soil.
3: Insert the Cutting: Place the cutting into the hole, ensuring the node is buried.
Step 5: Creating a Humid Environment
1: Cover with Plastic: Place a clear plastic bag over the pot or use a propagator to maintain humidity.
2: Ensure Air Circulation: Make a few small holes in the plastic to allow for air circulation.
Step 6: Caring for the Cuttings
1: Watering: Keep the soil consistently moist but not waterlogged.
2: Light Conditions: Place the cuttings in a bright, indirect light location.
3: Temperature: Maintain a temperature of 65-75°F (18-24°C) for optimal growth.

Monitoring and Transplanting
Checking for Root Growth
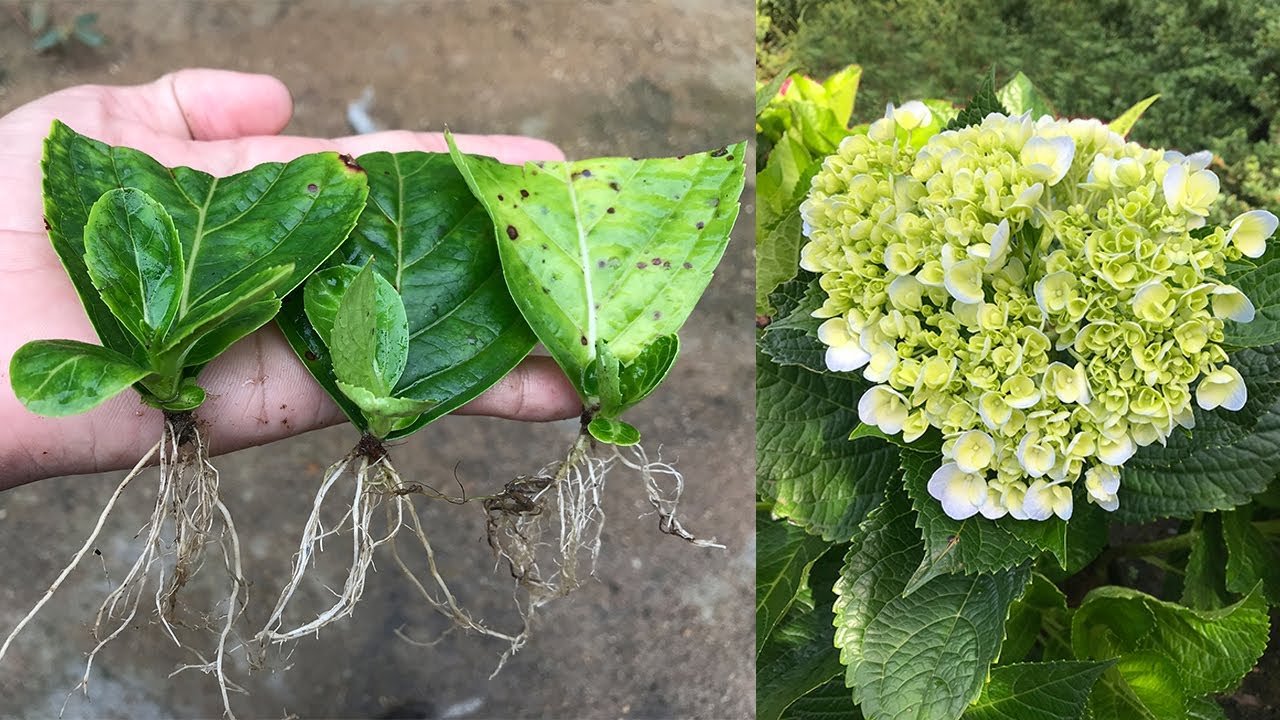
After 2-4 weeks, check for root growth by gently tugging on the cutting. If you feel resistance, roots have started to form.
Transplanting to Larger Pots
Once the cuttings have developed strong roots, transplant them into larger pots with a good-quality potting mix.
Continue to care for them in a sheltered environment until they are ready to be planted outside.
Troubleshooting Common Issues
Yellowing Leaves
If the leaves of your cuttings start to yellow, it may indicate overwatering or inadequate light. Adjust your care routine accordingly.
Mold Growth
Mold can develop if the environment is too humid. Ensure proper ventilation and reduce humidity if necessary.
Lack of Root Growth
If cuttings are not developing roots, consider reapplying rooting hormone or adjusting the temperature and light conditions.
Planting Hydrangeas Outdoors
Choosing the Right Location
Select a site with well-draining soil and partial to full sun, depending on the hydrangea variety.
Preparing the Soil
Amend the soil with compost to improve fertility and drainage.
Planting the Hydrangeas
1: Dig a Hole: Dig a hole twice as wide and as deep as the root ball.
2: Place the Plant: Place the hydrangea in the hole, ensuring the top of the root ball is level with the soil surface.
3: Backfill and Water: Fill in with soil, firm it down gently, and water thoroughly.
Long-Term Care for Hydrangeas
Watering
Hydrangeas need regular watering, especially during dry periods. Water deeply to encourage deep root growth.
Fertilizing
Feed your hydrangeas with a balanced, slow-release fertilizer in the spring and again in the summer to promote healthy growth and vibrant blooms.
Pruning
Prune hydrangeas in late winter or early spring to remove dead or damaged wood and to shape the plant.
Different hydrangea types have specific pruning requirements, so be sure to follow guidelines for your particular variety.
Conclusion
Growing hydrangeas from cuttings is a rewarding and cost-effective way to expand your garden.
With careful preparation, proper care, and attention to detail, you can successfully propagate these beautiful plants and enjoy their stunning blooms year after year.
Whether you’re a seasoned gardener or a beginner, this guide provides all the information you need to get started on your hydrangea propagation journey.
FAQs
Q1. How long does it take for hydrangea cuttings to root?
A1. Hydrangea cuttings typically take 2-4 weeks to develop roots, depending on the conditions and care provided.
Q2. Can I grow hydrangeas from cuttings indoors?
A2. Yes, hydrangeas can be started from cuttings indoors. Ensure they have adequate light and humidity to promote healthy root development.
Q3. What type of soil is best for planting hydrangeas?
A3. Hydrangeas prefer well-draining soil rich in organic matter. Amending your garden soil with compost can improve its quality.
Q4. How often should I water hydrangea cuttings?
A4. Keep the soil consistently moist but not waterlogged. Check the moisture level regularly to ensure the cuttings do not dry out or become too wet.
Q5. When is the best time to transplant hydrangea cuttings outdoors?
A5. Transplant hydrangea cuttings outdoors in the late spring or early summer when the risk of frost has passed and the cuttings have developed strong roots.